This tutorial is a followup to Instant Shiny Forms with Rails and YUI, with a bit more of an interesting technique that (I think, at least) really demonstrates where YUI shines. In the last tutorial, we embedded a hidden form in a “show” view, so we could render a YUI dialog instead of loading the edit page separately, or using a technique like in-place editing. While this is useful, I find it to be of somewhat limited utility. In this article I’ll demonstrate a technique to move that dialog to the index view using the Yahoo Connection Manager, so we can skip the show step all together.
Step One: The ‘_form’ partial
For the sake of simplicity, I’m going to cheat and reuse the partial from the last demo:
<% form_for(form) do |f| %>
  <%= f.error_messages %>


    <%= f.label :title %>
    <%= f.text_field :title %>


    <%= f.label :body %>
    <%= f.text_area :body, :rows => 6 %>


    <%= f.label :published %>
    <%= f.check_box :published %>

<% end %>
While we’re at it, let’s make one small change to the edit action in our countroller:
def edit
  @post = Post.find(params[:id])
  respond_to do |wants|
    wants.html
    wants.js { render :partial => 'form', :object => @post }
  end
end
This way, ajax calls will just get the form.
Step Two: The Index view
Again to keep things simple, we’re using a standard scaffold view here, with three changes. First, we’ll set an id on the table. And second, we want to add a class to all of the edit links, so we can find them again later. Finally, we also add a placeholder div in YUI module format, complete with our standard issue Web 2.0 spinner. With the changes, the final looks something like this:
<h1>Listing posts</h1>

<table id='posts'>
  <tr>
    <th>Title</th>
    <th>Body</th>
    <th>Published</th>
  </tr>

<% for post in @posts %>
  <tr>
    <td><%=h post.title %></td>
    <td><%=h post.body %></td>
    <td><%=h post.published %></td>
    <td><%= link_to 'Show', post %></td>
    <td><%= link_to 'Edit', edit_post_path(post), :class => 'edit_link' %></td>
    <td><%= link_to 'Destroy', post, :confirm => 'Are you sure?', :method => :delete %></td>
  </tr>
<% end %>
</table>

<br />

<%= link_to 'New post', new_post_path %>

<div id='edit_post_div' style='visibility: hidden;'>
	<div class="hd">Edit Post</div>
	<div class="bd"><%= image_tag 'spinner.gif' %> Loading...</div>
</div>
I did say this was straight scaffold, right?
Step Three: Javascript Includes and other layout nonsense
We return again to the YUI Dependency Configurator to get our includes in order. For this, we’ll need Container, Button and Connection Manager. We’ll go ahead and use the rollups, just to cut our download list a bit. We’ll also want to make sure we’re at least loading application.js, since we don’t want any code polluting our html if we don’t have to. Finally, add a class of ‘yui-skin-sam’ to the body element, so we pick up Yahoo’s skin for our dialog elements. Put it together, and this is the entirety of our layout:
<!DOCTYPE html PUBLIC "-//W3C//DTD XHTML 1.0 Transitional//EN"
"http://www.w3.org/TR/xhtml1/DTD/xhtml1-transitional.dtd">
<html xmlns="http://www.w3.org/1999/xhtml" xml:lang="en" lang="en">
<head>
<meta http-equiv="content-type" content="text/html;charset=UTF-8" />
<title>Posts: <%= controller.action_name %></title>
<%= stylesheet_link_tag 'scaffold' %>
<!-- css -->
<link rel="stylesheet" type="text/css" href="http://yui.yahooapis.com/2.5.2/build/assets/skins/sam/skin.css">
<!-- js -->
<script type="text/javascript" src="http://yui.yahooapis.com/2.5.2/build/utilities/utilities.js"></script>
<script type="text/javascript" src="http://yui.yahooapis.com/2.5.2/build/container/container-min.js"></script>
<script type="text/javascript" src="http://yui.yahooapis.com/2.5.2/build/menu/menu-min.js"></script>
<script type="text/javascript" src="http://yui.yahooapis.com/2.5.2/build/button/button-min.js"></script>
<%= javascript_include_tag 'application' %>
</head>
<body class="yui-skin-sam">
<p style="color: green"><%= flash[:notice] %></p>
<%= yield %>
</body>
</html>
Step Four: Implement our dialog
The basic strategy here is fairly simple. We use the edit_post_div skeleton to create a basic dialog. Then, we use the ‘edit_link’ class to add onClick handlers for all of the edit links in the table, which stash the href where we can get to it again, and show the dialog. When the dialog is shown, we do an http GET to fetch the appropriate form from the server and update the dialog. All told, it’s about 70 lines of code with comments. And most of that’s formatting:
// Wrap an outer function to prevent namespace pollution
(function() {
  // Set up some shortcuts to YUI bits
  var yLang = YAHOO.lang;
  var yDom = YAHOO.util.Dom;
  var yEvent = YAHOO.util.Event;
  var yConnect = YAHOO.util.Connect;
  var yDialog = YAHOO.widget.Dialog;

  // Placeholder for our dialog
  var editPost = null;

  // Set the default Accept header for Connection Manager to match
  // what Rails expects from js

  yConnect.initHeader('Accept',
    'text/javascript, text/html, application/xml, text/xml, */*', true);

  // When our placeholder is ready, build the initial Dialog
  yEvent.onContentReady('edit_post_div', function() {
    function handleSubmit (arg) {
      this.submit();
    }
    function handleCancel (arg) {
      this.cancel();
    }
    editPost = new YAHOO.widget.Dialog("edit_post_div",
      { width               : "30em",
        fixedcenter         : true,
        visible             : false,
        constraintoviewport : true,
        modal               : false,
        postmethod          : "form", // We're still going to do a normal form submit
        buttons : [ { text:"Submit", handler:handleSubmit, isDefault:true},
                    { text:"Cancel", handler:handleCancel } ]
      });
    editPost.render();

    // When the dialog is displayed, update its form
    editPost.subscribe('show', function() {

      function onSuccess (oArg) {
        // Set the body of the dialog to the returned form partial
        this.argument.setBody(oArg.responseText);
        // Re-render the dialog, just be on the safe side
        this.argument.render();
      }

      yConnect.asyncRequest('GET', this.sourceUrl, { success: onSuccess, argument:this });
    });
  });

  // When the user click on one of our edit links, show the edit dialog
  yEvent.onContentReady('posts', function() {
    var links = yDom.getElementsByClassName('edit_link', 'a', this);
    for (var i = links.length - 1; i >= 0; i--){
      yEvent.on(links[i], 'click', function(e) {
        // Stop event propagation
        yEvent.preventDefault(e);
        yEvent.stopPropagation(e);

        // Stash the clicked link
        this.sourceUrl = e.target.href;
        this.show();
      }, editPost, true);
    };

  });
})();
And that’s about all there is to it. Easy, right?
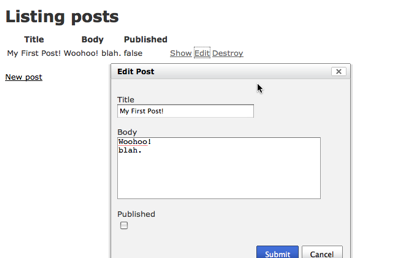
Obligatory screenshot of the finished product:
Spread it:  |
| |
| |
| |
| |
|
 RSS feed
[…] post, this time using connection manager: Dynamic dialogs with Rails and YUI Possibly related posts: (automatically generated)NUnitForms and Modal DialogsRetrenchingNavigating […]
[…] dialogs with Rails and YUI: Eric Hedberg from Enleitened has posted his second in a series of posts about using YUI with Rails. This time he’s taking on dialogs. "In the last tutorial, we embedded a hidden form in a […]
Hey,
neat idea!
Have you been able to use the “async” postmethod. That would be more REST alike! It tried it, but was not able!
Regards
—
Joachim
@Joachim- I’m using async with this without too much trouble, I just didn’t want to pollute the example with it. Mostly, I’d add a couple of functions, say, “handleSuccess” and “handleFailure” after line 26, then at line 37, insert three more lines to define the callbacks:
Does that help?
Hello Eric,
thank you for the reply. That was not the problem.
I figured out, that you need to give a proper configured dialog element to start from.
var container = document.createElement("div");
var hd = document.createElement("div");
YAHOO.util.Dom.addClass(hd, "hd");
var bd = document.createElement("div");
YAHOO.util.Dom.addClass(bd, "bd");
container.appendChild(hd);
container.appendChild(bd);
document.body.appendChild(container);
this._dialogContainer = container;
I just created the “container”, without the header and body elements. That made the dialog stop working, as the “registerForm” method attaches a dummy form with no elements.
Thank you
—
Joachim
Ah. Yeah, that would do it.
Unfortunately it doesn’t work out of the box with IE7 – I had to change line 63 of the JavaScript code to be
this.sourceUrl = e.target?e.target.href:e.srcElement.href;
So that it’d work with IE.
Thanks for the tutorial – guess what I’m going to be doing for the rest of the night … playing with YUI and Rails :)
[…] http://enleitened.com/2008/06/26/dynamic-dialogs-with-rails-and-yui/ […]